BD-Design - Only the best!
To be able to play CD's through the CrazyT you'll first have to copy your CD's to the hard disc of your computer (internal, external or to a network server).
The CrazyT only plays 16bit @ 44.1kHz WAV-files. With uncompressed files the needed space for one CD will be averaged 500MB, if you have 240 CD's then you'll need a 120GB HDD to be able to store them all. We do advise to use a much larger HDD though as the collection seems to grow pretty fast and please use a good program to copy CD's to your internal or external hard disc...
Of course you can also use FLAC (lossless compression) to save some space. For the CrazyT it is not a problem as the process to unpack those files during playback will stress the PC only (calculating) and not the CrazyT as this DAC plays independently and is not affected by that at all.
The optimal software to extract CD's to your PC with maximum quality is with Exact Audio Copy, a program which can be downloaded for free. The FLAC option is provided within this software as well.
Please install the included option for AccurateRip as this will help you to check your copy while "ripping" your CD's to your hard disc. This will give an indication that your copy is correct and equal to copies made by others.

When you run Exact Audio Copy for the first time then run a first test and follow the screen directions.
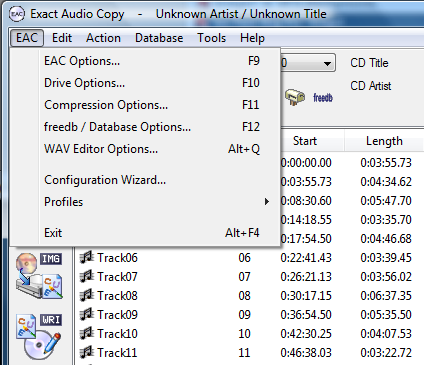
If you want to have this done manually then open from the menu [ EAC Options ] or press F9.

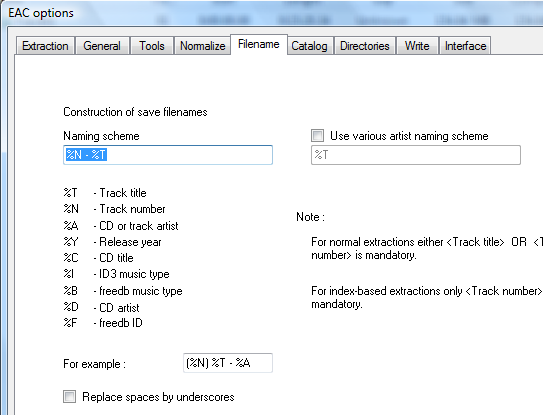
Most important part to have clear is the way the file names will be written to your hard disc. You can set it to anything you like, shown is the way I prefer to write the file names to my HDD. My only desire is to see the track number and track name as I store each CD in its own directory, manually given the name of the Artist and CD-Title (i.e. Stonehenge 5 - Revealing the Myth as example).

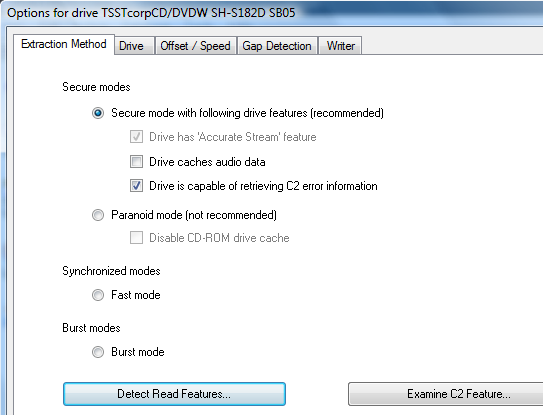
For the rest all settings in this menu do not need to be changed for making optimal copies from your CD's. It is important to set-up the drive you are going to use for making copies though. Please select from the menu [ Drive Options ] or press F10 so that the following menu appears. Put a CD in your drive and then click on [ Detect Read Features ].

After testing your drive you should enable [ Secure mode ] as read method to be sure that the copy process is done most optimally. The last but not the least setting to check/test is the offset of your drive. You will need a CD that is known by AccurateRip (i.e. copied before by other people and stored in the EAC on-line database) to be able to compare your results with those.

Load the CD (usually best to have a few more to test) and click on the Detect button. When all has worked out well then you will see a figure showing positive or negative samples which should be used as standard setting for your drive.
Almost done, last menu to check is the one for accessing the freeb database (select this option from the EAC menu or press F12). With the help of this database you do not have to type all track names if present in the database. All names will automatically be loaded in EAC (you have to supply your email address in the menu to make it work).

Notes: Everything should work out well with the described settings but it will surely help to use clean CD's if you want to work optimally before extracting the data.
Okay, time to make a first copy! Load your CD into the CDROM player and wait until EAC has found the related information from the freedb database. If no tracknames are given then the CD is unknown to freedb or it was not able to make a connection. You should be connected to the internet, if not then it does not work and you'll have to edit all tracks manually before you start making a copy of the CD.
When all filenames show then click on the WAV icon at the left side of EAC. EAC will now ask you where to store the tracks (this can be anywhere on your HDD but it would be wise to think about the organisation of your collection first to find them all back later). Usually these should go in one main directory called Music (or whatever you like) with subdirectories called Jazz, Classic, Pop, etc. (only if you want to have things nicely organised), in each of these directories youhave to create new directories each CD. When you have named the new directory (i.e. "Artist - CD-Title") then open it and click on save. All tracks will now be copied into that directory (this is where the scanned cover art picture of that CD has to go also).
The above used principle should be the same for the next CD's to come, make sure that the newly created directories are inside the right main directory. Shown below is an example tree, here each artist has its own directory with subdirectories for each CD.

With EAC you will not get any cover art automatically, not the biggest problem as most pictures on-line are not the best looking or even not the one you want to use. Most people do have a printer with scanner which gives the best possible cover art pictures. While "ripping" you have a few minutes to scan the CD cover and to put that picture into the same folder as the CD you're extracting.
It does not matter which name you give to those pictures, the CrazyT software will always show the first picture (alphabetical order and only JPG!) present in that directory. If you would like to see the pictures on top of the folder (Windows explorer) then you have to (re)name them to folder.jpg
Optimal size for these pictures would be minimal 500x500 pixels (96dpi) but if you plan to play the CrazyT software full screen then twice a much pixels can look better).
- CrazyT Software (Manual)
- Optional connections (including network solutions)
- Frequently Asked Questions
In case you do need more support which can't be found here then please contact us directly or use our forum to look or ask for answers to your questions.
